This post will take you through the steps required to launch a Wi-Fi deauthentication attack from your very own Flipper Zero. Some aspects of the setup confused me at first, but once it’s all running it’s actually very simple to execute! This tutorial will walk you through all of it.
WARNING: It is not only unethical but ILLEGAL to deauthenticate WiFi networks which are not your own without explicit permission. People run important, even lifesaving stuff on WiFi networks. DO NOT do anything illegal with the instructions in this guide. If you do, it’s not my fault. Warned you!
You will need:
- Flipper Zero With Firmware Installed
- Wi-Fi Devboard for Flipper Zero (firmware will be installed in tutorial)
- USB-C cable to connect Devboard to computer
- Computer With Chrome, Microsoft Edge, or Opera (many browsers do not support WebSerial)
- Basic Familiarity With Your Flipper Zero
Step One: Wi-Fi Devboard Firmware Install
The first step is the hardest. The WiFi marauder app for Flipper Zero doesn’t work without the firmware installed and running on the Devboard. This is the tutorial I watched to get this part working if you’d like to watch the original, but I explain it here.
- Create a new folder in your downloads to easily differentiate between firmware and unrelated files. Go to this website, and download the 0x1000, 0x8000, 0xE000, and 0x10000 files under “Flipper Zero WiFi Dev Board”. It’s helpful to rename these to the hexadecimal code (IE, 0x8000) you chose when downloading for later.
- Go to the web updater on a compatible browser.
- Plug the computer’s end of the cable in. Once you’re ready, press “connect” on the web updater site. Hold the “boot” button down on the Devboard, then plug the cable in. Let go of the boot button only once the cable is fully plugged in. Once this is complete, a new option should appear in the list of devices on the web updater site. Select this option then press “connect” under the list.
- Upload the corresponding file downloaded earlier for each of the options on the file upload list. 0x1000, 0x8000, 0xE000, and 0x10000. Once these are selected, press “program”!
- Wait for the flash to complete, then unplug the cable from the Devboard. Your firmware is now installed!
Step Two: Install the WiFi Marauder Flipper Zero App
The easiest way to do this is via the Flipper Zero mobile app. If you haven’t already, install the mobile app on your phone and pair your flipper and phone with Bluetooth. I highly recommend the mobile app if you aren’t using it already. It’s very easy to use to install updates and download apps. Instructions to download and set up are here if you need them.
Once you download the mobile app, make sure you’re connected to your flipper, and select “Hub” on the bottom right. Go into “Apps”. From here, you can either search for “[ESP32] WiFi Marauder” or look for it yourself under “GPIO”. Install it, and it’s on your Flipper Zero!
Step Three: Attack!
Connect your Devboard to the flipper zero with the GPIO pins, and enter the Wifi Marauder app. From here, you’ll be greeted by a whole list of options you can scroll through vertically and horizontally. In this interface, you use the vertical buttons to scroll through different categories like “Scan” or “Attack”, then use the horizontal buttons to choose the type of scan or attack before launching it. This gives easy GUI access to basic WiFi penetration commands, all from the Flipper Zero. Let’s launch our attack!
First, use the vertical buttons to go to “Scan”. Make sure the option is set to “AP”, then press the center button. This will begin a scan for WiFi networks in the vicinity.

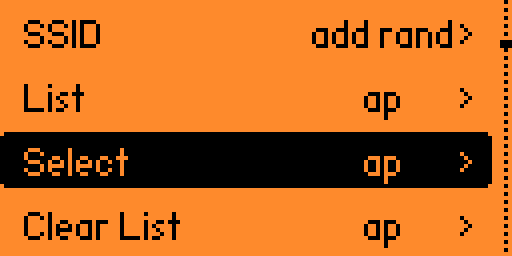
Press the back button after a few seconds. You shouldn’t have to scan long if you’re running the attack on a network nearby. Once that’s done, use the vertical buttons to go to “List”, and select “ap” then press the center button.

Once you’re in the list, use the vertical buttons to scroll through the APs in the vicinity. Stop once you find the SSID (name) of the network you want to attack, and make a mental (or physical!) note of the number to the left of it.

Exit the list using the back button, then use the vertical buttons to go to “select”. Select “ap” then press the center button.
Use the keyboard with the arrow keys and center button. Type the number from the list which was to the left of the WiFi network you want to attack. Press save, then press the back button.

Exit the target selection menu using the back button, and use the vertical buttons to go to “Attack”. Select “deauth” and press the center button.
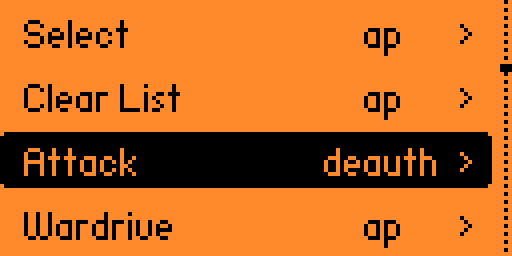
Your Flipper Zero is now sending deauthentication packets, which will disconnect any and all hosts from the WiFi network you selected. They’ll remain disconnected as long as this is running! Stop it using the back button once you’re finished.

Congratulations! You’ve just launched a deauthentication attack. This is one of the simplest attacks to do to a WiFi network, as it wreak tons of havoc without even knowing the password of the network you’re attacking. Remember, only use this attack with explicit permission. Intentions are key. Don’t try to do anything malicious with this attack. The information in this guide is provided “AS-IS”. In no event will the author of this guide be liable for any claim, damages, or other liability which arises from misuse of the instructions provided. Be responsible! Good luck!
Leave a Reply